
CLICK ABOVE LINK FOR DETAILS
CYBER HYGIENE
INTERNET
THREATS:
There are a lot of dangers that pose
clear threats to internet users and they seem to get more dangerous every day.
There are various threats which cause damage to your computer, and even to
networked computers.
Types
of Internet Threats:
A
virus is a program that replicates itself, usually by attaching itself to other
files and program. A worm is a program that does not infect other programs but
makes copies of itself. Trojan horse programs do not replicate nor make copies
of themselves, by rely on other "Manual" method of distribution.
Viruses are spread in a variety of ways.
SOME EXAMPLES:
DETECTING THREATS:
PROTECTION OF COMPUTER
FROM CYBER ATTACKS:
ANTI-VIRUS:
An antivirus program is designed to protect your computer from possible viruses
infection. Most viruses are designed to operate in the background that the user
will not notice. Virus protection program search for, detect, and attempt to
remove these viruses. Anti-virus program must be kept up to date in order for
them to provide adequate protection.
INSTALLING
SYMANTEC ANTIVIRUS 8.1:
ü Exit
other programs, already exiting antivirus software's on your computer.
ü Double
click the "Symantec 8.1 - setup.exe" installer.
ü The
installation window, labeled "Symantec antivirus client setup" will
open, click next to proceed.
ü Read
the license agreement and click on "I accept the terms of the license
agreement" and click Next button.
ü You
will be given the option to install snap-ins for checking e-mail. "Do not
check either of the snap-ins" click Next.
ü You
will be given an option to install either the Managed (or) unmanaged version of
Symantec Anti-Virus, click "Unmanaged" then click next.
ü Check
on "Run live update" and click Next and click "Install"
button.
ü A
window containing technology support information will appear click on Next.
ü Click
finish button and then "Reboot now".
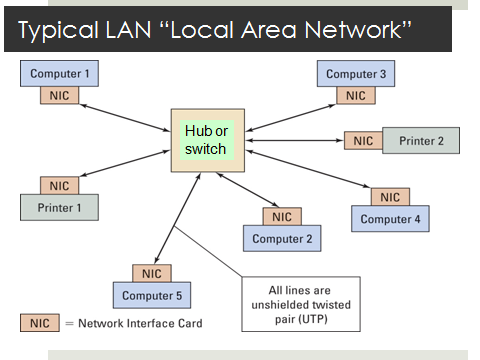
WEB BROWSERS AND SURFING THE WEB
Students
customize their web browsers with the LAN proxy settings, bookmarks, search
toolbars and pop up blockers. Also, plug-ins like Macromedia Flash and JRE for
applets should be configured.
Surfing (or) browsing the net means going across the internet in search of particular topic to surf the net we need a suitable tool which is nothing but a Web Browser.
Web Browsers help to download the required content and they communicate with server using TCP/IP Protocol to retrieve and display required information. These supports internet protocol like HTTP, FTP, using HTML. Web Browser uses powerful programming languages like Java, Java Script cold fusion, PHP (Hypertext preprocessor), VB (Visual Basic), XML (extended mark up languages), Perl (Practical extraction and reporting language) and other surfing languages.
The popular Web Browsers are Microsoft internet explorer, Mozilla Fire Fox, Apple Safari, net Scope Navigator, Opera, and Lynx.
CUSTOMIZING
WEB BROWSERS WITH LAN PROXY SETTINGS:
Here we have two options:
a. Dial-up and virtual private Network (VPN).
b. LAN setting.
The selection is dependent on kind of connections
you are trying to configure. They are:
i. Dial-up Modem connection.
ii. LAN connection.
iii. DSL (Digital) subscriber line) or cable Modem.
INTERNET
BOOK MARKS:
The
purpose of internet Book Mark is to easily access Web pages that the user has
visited and plans to visit.
The
book marks with in internet explorer are called favorites.
POP-UP
BLOCKERS:
1. Pop up adds (or) pop-ups are a form of one line advertising on www to attract the attention of users.
2. Pop up interrupt the user less but making it more difficult for the user to determine which Webs opened them.
3. Now must of the Web Browsers allow the user to block unwanted pop-up completely.
PLUG
– INS:
1. A plug – in is a software component program that interact with a main (host) program or application to provide better integration of Media.
2. Plug-ins extends the existing browser capabilities like Multimedia files are launched and place in browser window.
3. Few famous plug-ins are
® Apple quick time.
® Real Networks.
® Macromedia flash.
® Microsoft Media Player.
® Adobe shockwave.
® Sun Microsystems’s Java Applets.
SEARCH
ENGINES AND NETIQUETTE
SEARCH
ENGINE:
Search engines are one
of the primary ways that the internet users find websites. The term “search
engine” is often used generically to describe both crawler based search engines
and Human powered directories. These two types of search engines gather their
listings in radically different ways.
CRAWLER
BASED SEARCH ENGINES:
Crawler
Based search engines such as Google create their listings automatically. They
“Crawler” or “Spider” the web then people search through what they have formed
if you charge your Web pages crawler based search engines eventually find these
changes and that can affect how you are listed page little, body copy and other
elements which all play a role.
HUMAN
POWER DIRECTIONS:
A
human powered directory such as an open directory depends on humans for its
listing you submit a short description to the directory for your entire site
(or) editors write once for sites. They review a search looks for matches only
in the description submitted.
Search
engine software is the third part of search engine. This is the program that
sifts through the millions of pages recorded in the index to find matches to a
search and rank them in order of what it believes in most relevant.
NETIQUETTE
[INTERNET ETIQUETTE]:
RULES
FOR NETIQUETTE:
Rule1: Remember
the Human.
Rule2: Adhere
to real-life standards of behavior.
® Be
ethical.
® If
you use shareware, pay for it.
® Breaking
the law is bad Netiquette.
Rule3: Know
where you are in cyberspace.
Rule4: Respect
other people's time and bandwidth.
Rule5: Make
yourself look good online.
Rule6: Share
expert knowledge.
Rule7: Help
keep flame wars under control.
Rule8: Respect
other people's privacy.
Rule9: Don't
abuse your power.
Microsoft Word Shortcuts:
· To Create a New Document: Click the Office Button, select New, and click Create, or press <Ctrl> + <N>.
·
· To Save a Document: Click the Save button on the Quick Access Toolbar, or press <Ctrl> + <S>.
· To Save a Document with a Different Name: Click the Office Button, select Save As, and enter a new name for the document.
· To Preview a Document: Click the Office Button, point to the Print list arrow, and select Print Preview.
· To Print a Document: Click the Office Button and select Print, or press <Ctrl> + <P>.
·
To Undo: Click the
·
To Close a Document: Click the
· To Get Help: Press <F1> to open the Help window. Type your question and press <Enter>.
· To Exit Word: Click the Office Button and click Exit Word.
·
To Cut or Copy Text: Select the text you want to cut or copy and click the Cut
·
To Paste Text: Place the insertion point where you want to paste and click the Paste
· To Format Selected Text: Use the commands in the Font group on the Home tab, or click the Dialog Box Launcher in the Font group to open the Font dialog box.
·
To Copy Formatting with the
Format Painter: Select the text with the formatting
you want to copy and click the
·
To Change Paragraph
Alignment: Select the paragraph(s) and click the
appropriate alignment button ( Align
·
To Indent a Paragraph: Click the
·
To Decrease an Indent: Click the
·
To Add a Tab Stop: Click the
· To Adjust or Remove a Tab Stop: Click and drag the tab stop to the desired position on the Ruler. Click and drag the tab stop off the Ruler to remove it.
·
To Change Paragraph Line
Spacing: Click the
·
To Create a Bulleted or
Numbered List: Select the paragraphs you want to
bullet or number and click the
· To Change a Document’s Margins: Click the Page Layout tab on the Ribbon, click the Margins button in the Page Setup group, and select a setting.
· To Change Page Orientation: Click the Page Layout tab on the Ribbon, click the Orientation button, and select an option from the list.
· To Insert a Header or Footer: Click the Insert tab on the Ribbon and click the Header or Footer button in the Header & Footer group.
· To Insert a Manual Page Break: Click the Insert tab on the Ribbon and click the Page Break button in the Page Setup group.
· To Insert a Section Break: Click the Page Layout tab on the Ribbon, click the Breaks button in the Page Setup group, and select the type of break you want to insert.
· To Correct a Spelling Error: Right-click the error and select a correction from the contextual menu. Or, press <F7> to run the Spell Checker.
·
To Find Text: Click the
·
To Replace Text: Click the
Identify the problem in PC which does not boot due to improper assembly or defective peripherals, fix it toget the computer back to working condition.
AIM: Hardware
troubleshooting Troubleshoot:-
1. If you hit the power button & nothing happened.
Check all power connections.
Check for power on motherboard.
2. If the system turns on but does not beep or begin to bootup.
Remove all components except motherboard/ cpu / mother check by giving
power to them
Computer error beeps codes:
No beep: short, no power, bad CPU/ MD, :loose peripherals.
One beep: everything is normal & computer posted tax.
Two beeps: post / CMOS error.
One long beep One short beep: Motherboard problem.
One long beep two short beep: video problem.
One long beep 3 short beeps: video problem. 3
long beeps: keyboarderror.
Repeated long beep: memory error.
Continuous high- low beeps: CPU overheating Experiment no: 1
Basic troubleshooting:
Sometimes things do not work exactly as planned at this point. Sometimes the system will not power
on at all. Sometimes it will power on, but you get no video. Sometimes you will get beep codes.
Sometimes you hear the fans, but the rest of the PC just sits there and does nothing. If things didn't go according to plan, troubleshoot the system. Walk mentally through the boot process and check all
hardware as it goes. Think like the computer thinks, if you know what I mean. Here is a list of some
of the more commonproblems.
1. The power does not even turn on. This sometimes happens on ATX machines and it usually
tracks down to the fact that the power switch is not properly connected to the motherboard or
it is not connected at all. Find the power switch lead and make sure it is connected to the
motherboard.It’sapossibilitythatsimplyreversingtheleadwilldothetrick.Ifthisisthenot
the case, then make sure the motherboard is not grounded somehow. Make sure that the board
is not touching the case (this is what the spacers are for). Make sure that none of the screws
that hold the board in place is touching anything metal or any of the electrical pathways on the
motherboard. If you have any doubt on this, you can remove each screw one at a time and
place a washer on them. You do not need to remove the motherboard to do this.
2. The PC boots, but it is giving beep codes. This is actually better than having to track
everything down on your own, because at least the PC is giving you a hint as to what is
wrong. You can also use the PC Mechanic Beep Codes E-book available on the PC Mechanic
CD to track it down for other BIOS versions. Often, these beep codes will not tell you exactly
what the problem is, but will point you at the trouble device. This information will then get
you pointed in the correctdirection.
3. The fans come on, but you get no video or beeps. Sometimes, this is because some key
component may not be plugged in well or may not be operational. Check the memory modules
and the processor to be sure they are firmly installed. You might want to make sure the
processor is actually working. One way that I have used to see if a processor is working is to
remove or unplug the CPU fan and place your fingers on the CPU to see if it heats up real fast.
If it does, its OK and don’t let it run this way for long. If it remains at room temperature for
awhile, then there is no juice going through the processor and it may need replacing. The
keyboard doesn’t seem to work. This one doesn’t happen too often, but if it does, your two
trouble sources will be the keyboard itself or the keyboard controller on the motherboard.
Hope it isn’t the secondone.
AIM: Software troubleshooting
PROCEDURE:
Error messages encountered during boot before Windows loads
Ensure that your computer BIOS settings are correctly configured to the hardware that is installed in
your computer Error messages while windows loading
1.If you have recently installed or changed something that could have caused normal windows to stop
loading , try loading the last known good configuration
2.If you are unable to get into Normal windows and believe that removing or uninstalling a program
or changing a setting may help enable you to get into windows , boot the computer into windows XP
safemode.
3.If your computer has worked fine in the past but recently has been experiencing the issue you are
encountering run the system restore option to restore the computer to an earlierdate
Other error messages that occur while windows is loading or after windows is loaded
1.If error occur but windows still loads , verify no issues or conflict exits in device manager
2.Ensure that if programs are loading automatically that these errors are not associated with these
programs
3.Make sure Windows XP is up to date by checking Microsoft windows updatepage
4.If your computer has virus protection installed make sure that it is up to date and that no virus are
Being detected
5. If your computer has worked fine in the past but recently has been experiencing the issue you
are encountering run the system restore option to restore the computer to an earlierdate.
Software Troubleshooting:
BIOS SETUP & DISK FORMATTING
What Is BIOS?
BIOS is an acronym for Basic Input Output System.
To run any system, there must be default settings so that the system can load those settings when it is started or restarted. For a computer system the basic I/O settings and boot process details are
necessary to start a system.
All these default, predefined settings will be loaded in the BIOS and whenever we start the system,
these settings will be loaded.
How to view BIOS?
Whenever we start the system, we can enter into the BIOS Setup Utility by pressing Del Key.
Sometimes an F1 or F8 key has to be instead of DEL key, depending on the type of BIOS.
When we enter in to this utility we get these following menus/services, depending upon our mother
board.
In main Menu, we can view the details such as BIOS Version, Processor Type, and Speed, RAM
Size and the system bus speed and memory speed.
We can change the settings like language system time and date. We can even change the hyper threading facility if the processor supports this technology.
We must be very careful when we change these settings otherwise it may cause our system to
malfunction.
Here, we can change the settings of PCI devices, Floppy Drives configuration and chipset, USB
peripheral devices and even monitoring the Hardware.
Security
We can set the supervisor password, to restrict unauthorized users to enter the BIOS setup utility.
User password can also be set to restrict the unauthorized persons to boot or use the system.
How to type a Password?
We can even set the Chassis Intrusion to protect the system devices from removing the components of the system.
Power
The power settings protect the system from power failures by configuring the ACPI.
For example, after power failure we can stay off the system or Power on the system or else we can
even make the system to restore its previous state by selecting the appropriate options.
Boot
Silent boot : If this option is enabled it displays only the OEM logo and in the background
POST (Power on Self Test) completes. If this is disabled, instead of LOGO, we can view POST
messages
Rapid BIOS Boot: By enabling this option it will decrease the time needed to boot the by skipping
some unnecessary tests.
Here, we can also set the boot sequence from the available devices by selecting Boot Device Priority.
We can even view the Hard Drives and any removable devices and attached to the system.
Exit :
By selecting the appropriate options we can exit from the BIOS setup like exiting the setup by saving
or discarding the changes or even by loading optimal or default values.
Given a computer in working
condition, disassemble and assemble it back to Working condition.
Procedure:
![]()
List of Computer Parts are: Cabinet,
MotherBoard, Processor, Hard Disk, RAM, SMPS, Floppy Drive, DVD R/W Drive, AGP
Card, and VGA Card etc…
![]()
Materials required:
¨
Philips
head Screwdriver (also known as Star Screwdriver)
¨
Flat
head Screwdriver
¨
Forceps
(for pulling out jumpers and screws)
¨
Magnetized
Screwdriver
¨
Multi
meter (Testing)
Ø Disassembling means removing part by part in a
system or removing the partsseparately.
Steps to Disassemble a PC:-
¨
Remove the Power Supply from wall socket and remove all the
connections.
¨
Remove all the screws of the cabinet with a star headed
screw driver and open the cabinet doors.
¨
Remove
the connections to the processor from SMPS.
¨
Remove
the SMPS
¨
Remove
the Heat Sink fan which is placed on the top of the processor.
¨
Remove
the Processor by raising the lift lever.
¨
Remove
the RAM from the RAM Slots.
¨
Remove
the AGP Cards if any.Also Remove VGA Cards if any.
¨
Remove
the Network Cards if any.
¨
Remove
the Connections to the Hard Disk from motherboard.
¨
Remove the Connections to the CD/DVD/Floppy Disk from
motherboard.
¨
Remove
the Motherboard from the cabinet.
Assembling:
Ø After
buying all the computer components they must be put together. This process is
called assembling.
Steps to Assemble a PC:-
1)
Install the Motherboard to the cabinet using the star headed
screw driver.
2)
Install
the Processor by raising the lift lever on the CPU Socket.
3)
Install
the Heat Sink fan.
4)
Install
the SMPS (Switch Mode Power Supply)
5)
Give
the connections to the processor from the SMPS.
6)
Install
the RAM in to the RAM Slots.
7)
Install the VGA Cards. (VGA à Video
Graphic Adapter)
8)
Install the AGP Cards. (AGP à
Accelerated Graphics Port)
9)
Install the Network Cards.
10)
Install
the Hard Disk.
11)
Install
the CD/DVD/Floppy Disk to the motherboard.
12)
Screw
the doors of the cabinet using the star headed screw driver.
13)
Finally give all the connections including the power supply
from the wall socket.
Note: Be
sure to handle all the components with great care. If a screw is dropped on the
Motherboard;it can damage the delicate circuitry.


